Welcome to my Woodworking Blog - She Works Wood. Below are pictures of what I'm working on or have completed. I hope you enjoy the pictures and commentary, Marilyn in Seattle.

Friday, December 31, 2010

Done!

The end tables are done ..


.. and installed.


... And yes, I'll still have to make the drawers.

Hmmm .. looks like we might need some help in the lamp department.

Wednesday, December 29, 2010

Ready, set ... wall cabinets!

So I made a space for my tool wall cabinet in the garage and in the process did a through cleaning and a modest bench upgrade so that I can do a lot of the future projects with hand tools. And I will be finding an new location for the toy (the Jet planer/jointer).

I'll be doing another wall cabinet for the bathroom. Busy, busy, busy!


Monday, December 27, 2010

Modifying the workbench for hand planing

In other words .. shortening the height of the work bench, installing bench dog holes and later a dead man.


Sawing off the leg height ..


Friday, December 24, 2010

Underside bevel of the Table top

I was able to complete the underside bevel on the table top with my hand planes .. and it was very fun to do. Tough to take a picture of, though!

On the next one, I need to be a little less aggressive with my marking gauge.


Thursday, December 23, 2010

Starting to think about the finish

These guys will get a lot of use .. so it's poly!

Bridge City Saw

Don't know much about it, but the idea is cool!
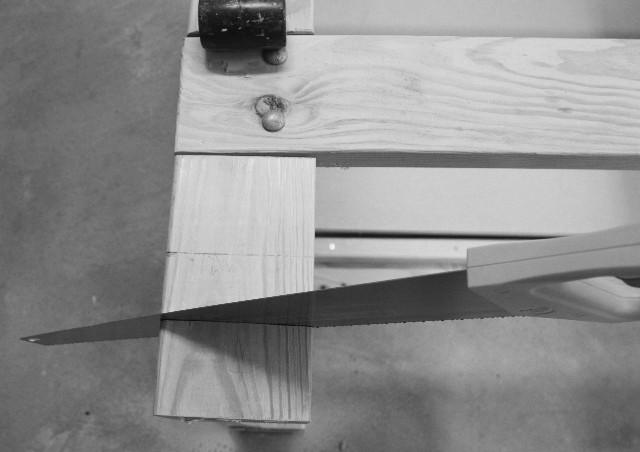
"..the Jointmaker is that it is a hand-powered table saw that uses a Japanese saw blade mounted so that a table slides very precisely above it. The saw blade can be tilted in both directions and can be adjusted for depth. This simple flexibility allows it to make incredible things, from snug-fitting tenons to crazily precise miters.

As far as I can tell, it does everything a regular table saw does except for long rip cuts, which is why it is called the Jointmaker. Producing almost no noise and using no electrical power, it is quite a minimalist saw, but that’s the point."

Bridge City Saw

Sunday, December 19, 2010

Playing with my early Christmas present

Labeling my work was Larua's idea so guess what I got as an early Christmas present? I stamped my first initial, last name and 2010 in the end tables today. What fun! Who would have thought?

End Tables start to come together

The fitting.


Using my new skewed rabbit plane to trim the tenons to a perfect fit. I used Chris Schwarz's suggestion and removed the front knob which makes the plane look pretty, but gets in the way during use.


Friday, December 17, 2010

12.17 End Table Progress

This is as far as I got today. The first dry assembly on the first table. Drawer runners for front still need to be created and installed. My newly sharpened paring chisels made this a fast and easy fitting.

Saturday, December 11, 2010

Dec 11 ET Progess

Sides of tables are glued up with mortises strips in place.


Schemeing about the workshop

I'm thinking about a deadman and a new top with vice and bench dog holes.


And some rearranging ..


Friday, December 10, 2010

Dec 10 ET Progress

Saturday, December 4, 2010

Greenlee Butt Chisels


Greenlee Butt Chisels.
One-owner Greenlee bevel edge butt chisels include the widths: ¾, 1 ½, and 2 inches. They all have similar solid leather end handles. The blades are clean, but lightly tarnished. All three share a mark of 2 filed notches high on the sockets—surely an owner’s mark. Easily Good+

Sunday, November 21, 2010

End Table Progress

The sides are starting to come together.


This hobby is hard on your hands.

Saturday, November 20, 2010

End Table Stretchers (side panels)

I love my new jointer hand plane. It allows me to do things I would never be able to do otherwise. These are the side panels that will hold the verticals spindles.


What it will look like.

Sunday, November 14, 2010

New End Tables Progress

What will be the final project.


Ruff lay out.


Legs in ruff form.


Mortises going in.


The final legs.

Saturday, October 30, 2010

The Back Story of the Chest of Drawers

Link to a little write up I did for Marc Spagnuolo and his on-line woodworking school for the Chest of Drawer project.

Sunday, October 24, 2010

Thursday, October 7, 2010

Sunday, September 26, 2010

Saturday, September 25, 2010

The Top .. clamp free


No Sanding Necessary

Friday, September 24, 2010

Tomorrow we see ..

Thursday, September 23, 2010

The Drawers Are IN


Now for fitting and a top!

Wednesday, September 8, 2010

Friday, September 3, 2010

The Wall Cabinet Home

Tuesday, August 31, 2010

8.31.2010 CoD Progress


The Case

Monday, August 23, 2010

Progress


Saturday, August 21, 2010

The new band saw

Saturday, August 14, 2010

She's got legs

Legs for the Chest of Drawer (COD)


Slots for the side panels

Sunday, August 8, 2010

Siding Project

We've been remodeling since 2001. The contractor did all of the construction, but I did siding (except for really high stuff), interior trim and most of the paint.

This is what the housed looked like in 2001


After updating the dormer and porch, this is what it looked like in 2008. Notice the 1906 dirt floor carriage garage. All I could do with this was store tools.


Garage Demo


After the 2009 remodel. The garage has become my shop.


1x4 hand nailed cedar siding in progress